With 4Videosoft YouTube Video Converter , you can convert any video formats MPG, MPEG, MP4, AVI, MOD, etc to YouTube FLV and SWF format, and then easily upload to all the video sites like YouTube, Myspace, Yahoo! Video, Google Video, etc.
How to convert Video to YouTube
Step 1: Download 4Videosoft YouTube Video Converter , install and run it.
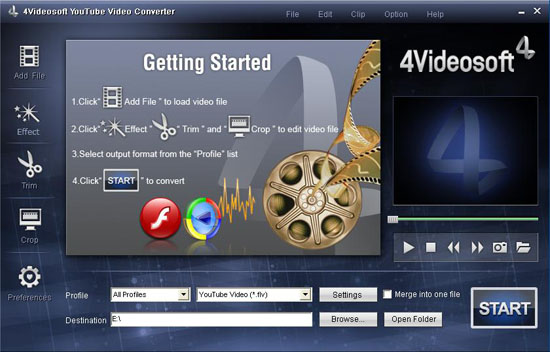
Step 2: Click “Add File” to add Video from your computer.
Double click this video converter, then will start to experience this powerful video converter.
(1) Add: Add the video files.
Click to add the video files you want to convert .
The supporting input format including:
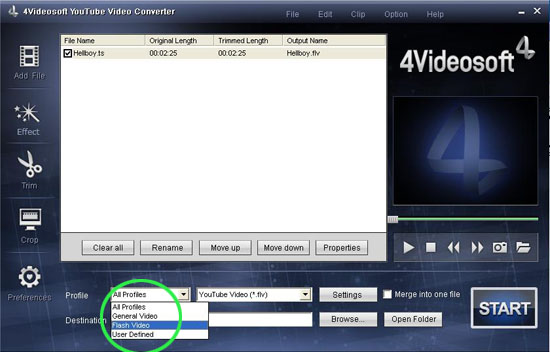
(2) Profile: Choose the output format from the "Profile” Column, find the format or the devices your player supports .
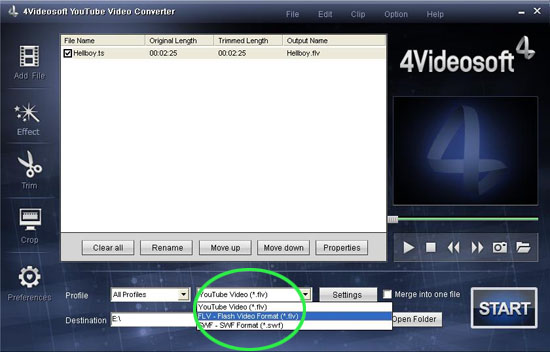
The output format is also powerful, you can see from the following picture.
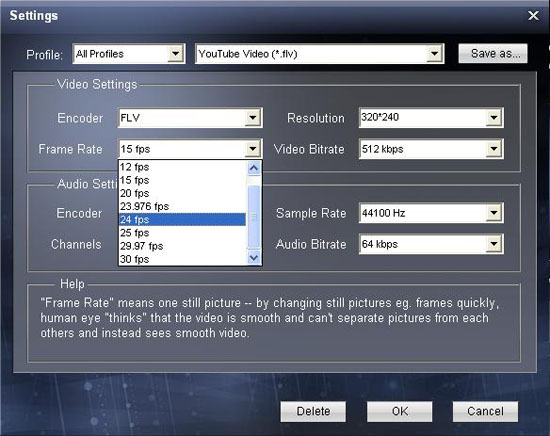
(3) Settings: Click "Settings” to open the settings window.
(4) Merge: You also can put you file into one, just click” Merge into one file”, that’s ok.
(5) Destination: Click the "Browse”, you can put the converted file into what you want disk, and in the "Open Folder”, you can find the file
There are also powerful functions such as “Effect”, “Trim”, “Crop” .
Step 3: Start conversion
Click the "START” to convert your file. It will be finished in a little time.
There are some other good converters you may need
4videosoft Tod Mod Converter
4videosoftQuickTime Video Converter
4videosoftCell Phone Video Converter
4videosoft AVC Converter
Step 1: Download 4Videosoft YouTube Video Converter , install and run it.
Step 2: Click “Add File” to add Video from your computer.
Double click this video converter, then will start to experience this powerful video converter.
(1) Add: Add the video files.
Click
to add the video files you want to convert .The supporting input format including:
(2) Profile: Choose the output format from the "Profile” Column, find the format or the devices your player supports .
The output format is also powerful, you can see from the following picture.
(3) Settings: Click "Settings” to open the settings window.
(4) Merge: You also can put you file into one, just click” Merge into one file”, that’s ok.
(5) Destination: Click the "Browse”, you can put the converted file into what you want disk, and in the "Open Folder”, you can find the file
There are also powerful functions such as “Effect”, “Trim”, “Crop” .
Step 3: Start conversion
Click the "START” to convert your file. It will be finished in a little time.
There are some other good converters you may need
4videosoft Tod Mod Converter
4videosoftQuickTime Video Converter
4videosoftCell Phone Video Converter
4videosoft AVC Converter
Unattended Windows XP Installation
In this post i am here to discussed about the installation of Win XP unattended. That means you dont have to click or make changes while installig XP, it will be taken care automatically. It will save your precious time.Now Copy all the Contents of Win Xp CD to some folder let me name it as "XPCD" and let the location of that folder be C:\XPCD
Now we will create a windows file which is located under i386 folder of windows XP CD.
First Step:Please create a WINNT.txt file on your desktop and then copy paste the code mentioned below.
--------------------------------------------------
[Data]
AutoPartition=1
UnattendedInstall="Yes"
AutomaticUpdates=yes
MsDosInitiated=No
[Unattended]
UnattendMode=DefaultHide
OemSkipEula=Yes
TargetPath=\WINDOWS
Repartition=Yes
UnattendSwitch="yes"
WaitForReboot="No"
KeyboardLayout="United Kingdom"
Hibernation=No
OemPreinstall=Yes
DriverSigningPolicy=Ignore
NonDriverSigningPolicy=Ignore
[GuiUnattended]
AdminPassword=*
EncryptedAdminPassword=NO
OEMSkipRegional=1
OEMSkipWelcome=1
TimeZone=85
[TapiLocation]
CountryCode=44
Dialing=Tone
AreaCode=0000
[UserData]
ProductKey=XXXXX-XXXXX-XXXXX-XXXXX-XXXXX
FullName="Authorised User"
OrgName="N/A"
ComputerName=MYPC
[RegionalSettings]
LanguageGroup=1
SystemLocale=00000809
UserLocale=00000809
InputLocale=0809:00000809
[Networking]
InstallDefaultComponents=No
[Identification]
JoinWorkgroup = XPBUILD
[Components]
hypertrm=off
iis_asp=off
iis_internetdataconnector=off
iis_serversideincludes=off
iis_webadmin=off
iis_webdav=off
licenseserver=off
msmsgs=off
msnexplr=off
oeaccess=off
templates=off
zonegames=off
----------------------------------------------------------
Now copy this text file in windows i386 folder that is located in C:\XPCD, rename the file to WINNT.sif. If incase you are not able to see the extention of the file then goto explorer and navigate towards tools > folder options and then make sure the option ""Hide extensions for known file types" is uncheck. After this create a windows XP CD and you will be able to run for Win XP Automatically.
The changes which i have made in the above file are as per the location UK. Please do change as per your location.
Commands used in command prompt.
ADDUSERS Add or list users to/from a CSV file
ARP Address Resolution Protocol
ASSOC Change file extension associations•
ASSOCIAT One step file association
ATTRIB Change file attributes
b
BOOTCFG Edit Windows boot settings
BROWSTAT Get domain, browser and PDC info
c
CACLS Change file permissions
CALL Call one batch program from another•
CD Change Directory - move to a specific Folder•
CHANGE Change Terminal Server Session properties
CHKDSK Check Disk - check and repair disk problems
CHKNTFS Check the NTFS file system
CHOICE Accept keyboard input to a batch file
CIPHER Encrypt or Decrypt files/folders
CleanMgr Automated cleanup of Temp files, recycle bin
CLEARMEM Clear memory leaks
CLIP Copy STDIN to the Windows clipboard.
CLS Clear the screen•
CLUSTER Windows Clustering
CMD Start a new CMD shell
COLOR Change colors of the CMD window•
COMP Compare the contents of two files or sets of files
COMPACT Compress files or folders on an NTFS partition
COMPRESS Compress individual files on an NTFS partition
CON2PRT Connect or disconnect a Printer
CONVERT Convert a FAT drive to NTFS.
COPY Copy one or more files to another location•
CSCcmd Client-side caching (Offline Files)
CSVDE Import or Export Active Directory data
d
DATE Display or set the date•
DEFRAG Defragment hard drive
DEL Delete one or more files•
DELPROF Delete NT user profiles
DELTREE Delete a folder and all subfolders
DevCon Device Manager Command Line Utility
DIR Display a list of files and folders•
DIRUSE Display disk usage
DISKCOMP Compare the contents of two floppy disks
DISKCOPY Copy the contents of one floppy disk to another
DISKPART Disk Administration
DNSSTAT DNS Statistics
DOSKEY Edit command line, recall commands, and create macros
DSADD Add user (computer, group..) to active directory
DSQUERY List items in active directory
DSMOD Modify user (computer, group..) in active directory
DSRM Remove items from Active Directory
e
ECHO Display message on screen•
ENDLOCAL End localisation of environment changes in a batch file•
ERASE Delete one or more files•
EXIT Quit the current script/routine and set an errorlevel•
EXPAND Uncompress files
EXTRACT Uncompress CAB files
f
FC Compare two files
FIND Search for a text string in a file
FINDSTR Search for strings in files
FOR /F Loop command: against a set of files•
FOR /F Loop command: against the results of another command•
FOR Loop command: all options Files, Directory, List•
FORFILES Batch process multiple files
FORMAT Format a disk
FREEDISK Check free disk space (in bytes)
FSUTIL File and Volume utilities
FTP File Transfer Protocol
FTYPE Display or modify file types used in file extension associations•
g
GLOBAL Display membership of global groups
GOTO Direct a batch program to jump to a labelled line•
h
HELP Online Help
i
iCACLS Change file and folder permissions
IF Conditionally perform a command•
IFMEMBER Is the current user in an NT Workgroup
IPCONFIG Configure IP
k
KILL Remove a program from memory
l
LABEL Edit a disk label
LOCAL Display membership of local groups
LOGEVENT Write text to the NT event viewer.
LOGOFF Log a user off
LOGTIME Log the date and time in a file
m
MAPISEND Send email from the command line
MBSAcli Baseline Security Analyzer.
MEM Display memory usage
MD Create new folders•
MKLINK Create a symbolic link (linkd)
MODE Configure a system device
MORE Display output, one screen at a time
MOUNTVOL Manage a volume mount point
MOVE Move files from one folder to another•
MOVEUSER Move a user from one domain to another
MSG Send a message
MSIEXEC Microsoft Windows Installer
MSINFO Windows NT diagnostics
MSTSC Terminal Server Connection (Remote Desktop Protocol)
MUNGE Find and Replace text within file(s)
MV Copy in-use files
n
NET Manage network resources
NETDOM Domain Manager
NETSH Configure Network Interfaces, Windows Firewall & Remote access
NETSVC Command-line Service Controller
NBTSTAT Display networking statistics (NetBIOS over TCP/IP)
NETSTAT Display networking statistics (TCP/IP)
NOW Display the current Date and Time
NSLOOKUP Name server lookup
NTBACKUP Backup folders to tape
NTRIGHTS Edit user account rights
p
PATH Display or set a search path for executable files•
PATHPING Trace route plus network latency and packet loss
PAUSE Suspend processing of a batch file and display a message•
PERMS Show permissions for a user
PERFMON Performance Monitor
PING Test a network connection
POPD Restore the previous value of the current directory saved by PUSHD•
PORTQRY Display the status of ports and services
POWERCFG Configure power settings
PRINT Print a text file
PRNCNFG Display, configure or rename a printer
PRNMNGR Add, delete, list printers set the default printer
PROMPT Change the command prompt•
PsExec Execute process remotely
PsFile Show files opened remotely
PsGetSid Display the SID of a computer or a user
PsInfo List information about a system
PsKill Kill processes by name or process ID
PsList List detailed information about processes
PsLoggedOn Who's logged on (locally or via resource sharing)
PsLogList Event log records
PsPasswd Change account password
PsService View and control services
PsShutdown Shutdown or reboot a computer
PsSuspend Suspend processes
PUSHD Save and then change the current directory•
q
QGREP Search file(s) for lines that match a given pattern.
r
RASDIAL Manage RAS connections
RASPHONE Manage RAS connections
RECOVER Recover a damaged file from a defective disk.
REG Registry: Read, Set, Export, Delete keys and values
REGEDIT Import or export registry settings
REGSVR32 Register or unregister a DLL
REGINI Change Registry Permissions
REM Record comments (remarks) in a batch file•
REN Rename a file or files•
REPLACE Replace or update one file with another
RD Delete folder(s)•
RMTSHARE Share a folder or a printer
ROBOCOPY Robust File and Folder Copy
ROUTE Manipulate network routing tables
RUNAS Execute a program under a different user account
RUNDLL32 Run a DLL command (add/remove print connections)
s
SC Service Control
SCHTASKS Schedule a command to run at a specific time
SCLIST Display NT Services
SET Display, set, or remove environment variables•
SETLOCAL Control the visibility of environment variables•
SETX Set environment variables permanently
SHARE List or edit a file share or print share
SHIFT Shift the position of replaceable parameters in a batch file•
SHORTCUT Create a windows shortcut (.LNK file)
SHOWGRPS List the NT Workgroups a user has joined
SHOWMBRS List the Users who are members of a Workgroup
SHUTDOWN Shutdown the computer
SLEEP Wait for x seconds
SLMGR Software Licensing Management (Vista/2008)
SOON Schedule a command to run in the near future
SORT Sort input
START Start a program or command in a separate window•
SU Switch User
SUBINACL Edit file and folder Permissions, Ownership and Domain
SUBST Associate a path with a drive letter
SYSTEMINFO List system configuration
t
TASKLIST List running applications and services
TASKKILL Remove a running process from memory
TIME Display or set the system time•
TIMEOUT Delay processing of a batch file
TITLE Set the window title for a CMD.EXE session•
TLIST Task list with full path
TOUCH Change file timestamps
TRACERT Trace route to a remote host
TREE Graphical display of folder structure
TYPE Display the contents of a text file•
u
USRSTAT List domain usernames and last login
v
VER Display version information•
VERIFY Verify that files have been saved•
VOL Display a disk label•
w
WHERE Locate and display files in a directory tree
WHOAMI Output the current UserName and domain
WINDIFF Compare the contents of two files or sets of files
WINMSD Windows system diagnostics
WINMSDP Windows system diagnostics II
WMIC WMI Commands
x
XCACLS Change file and folder permissions
XCOPY Copy files and folders
:: Comment / Remark•
YouTube Link: here
This procedure demonstrates how to install Windows XP Professional. The procedure to install Windows XP home edition is very similar to the professional edition. Since Windows XP Pro is more advanced operating system, it will be used to demonstrate the installation procedure.
This procedure demonstrates how to install Windows XP Professional. The procedure to install Windows XP home edition is very similar to the professional edition. Since Windows XP Pro is more advanced operating system, it will be used to demonstrate the installation procedure.
The best way install Windows XP is to do a clean install. It is not difficult to perform a clean installation. Before you perform the installation I recommend that you check Windows XP Compatibility List to ensure that your hardware is supported by XP. If your hardware is not on the compatibility list you can check your hardware manufactures website to download the drivers for Windows XP. Save all the necessary drivers onto floppy disks or CD before you start the installation.
All versions of Windows XP CD are bootable. In order to boot from CD/DVD-ROM you need to set the boot sequence. Look for the boot sequence under your BIOS setup and make sure that the first boot device is set to CD/DVD-ROM. You can then perform the following steps to install Windows XP:
Step 1 - Start your PC and place your Windows XP CD in your CD/DVD-ROM drive. Your PC should automatically detect the CD and you will get a message saying "Press any key to boot from CD". Soon as computer starts booting from the CD your will get the following screen:

Step 2 - At this stage it will ask you to press F6 if you want to install a third party Raid or SCSI driver. If you are using a an IDE Hard Drive then you do not need to press F6. If you are using a SCSI or SATA Hard drive then you must press F6 otherwise Windows will not detect your Hard Drive during the installation. Please make sure you have the Raid drivers on a floppy disk. Normally the drivers are supplied on a CD which you can copy to a floppy disk ready to be installed. If you are not sure how to do this then please read your motherboard manuals for more information.

Step 3 - Press S to Specify that you want to install additional device.

Step 4 - You will be asked to insert the floppy disk with the Raid or SCSI drivers. Press enter after you have inserted the disk.

Step 5 - You will see a list of Raid drivers for your HDD. Select the correct driver for your device and press enter.

Step 6 - You will then get a Windows XP Professional Setup screen. You have the option to do a new Windows install, Repair previous install or quit. Since we are doing a new install we just press Enter to continue.

Step 7 - You will be presented with the End User Licensing Agreement. Press F8 to accept and continue

Step 8 - This step is very important. Here we will create the partition where Windows will be installed. If you have a brand new unformatted drive you will get a screen similar to below. In our case the drive size is 8190MB. We can choose to install Windows in this drive without creating a partition, hence use the entire size of the drive. If you wish to do this you can just press enter and Windows will automatically partition and format the drive as one large drive.
However for this demonstration I will create two partition. The first partition will be 6000MB (C: drive) and second partition would be 2180MB (E: drive). By creating two partition we can have one which stores Windows and Applications and the other which stores our data. So in the future if anything goes wrong with our Windows install such as virus or spyware we can re-install Windows on C: drive and our data on E: drive will not be touched. Please note you can choose whatever size partition your like. For example if you have 500GB hard drive you can have two partition of 250GB each.
Press C to create a partition.

Step 8 - Windows will show the total size of the hard drive and ask you how much you want to allocate for the partition you are about to create. I will choose 6000MB. You will then get the screen below. Notice it shows C: Partition 1 followed by the size 6000 MB. This indicates the partition has been created. We still have an unpartitioned space of 2189MB. Next heighlight the unpartitioned space by pressing down the arrow key. Then press C to create another partition. You will see the total space available for the new partition. Just choose all the space left over, in our case 2180MB.

Step 9 - Now you will see both partition listed. Partition 1 (C: Drive) 6000MB and Partition 2 (E: Drive) 2180MB. You will also have 8MB of unpartitioned space. Don't worry about that. Just leave it how its is. Windows normally has some unpartitioned space. You might wonder what happened to D: drive. Windows has automatically allocated D: drive to CD/DVD-ROM.
Select Partition 1 (C: Drive) and press Enter.

Step 10 - Choose format the partition using NTFS file system.This is the recommended file system. If the hard drive has been formatted before then you can choose quick NTFS format. We chose NTFS because it offers many security features, supports larger drive size, and bigger size files.

Windows will now start formatting drive C: and start copying setup files as shown on the two images below :


Step 11 - After the setup has completed copying the files the computer will restart. Leave the XP CD in the drive but this time DO NOT press any key when the message "Press any key to boot from CD" is displayed. In few seconds setup will continue. Windows XP Setup wizard will guide you through the setup process of gathering information about your computer.

Step 12 - Choose your region and language.

Step 13 - Type in your name and organization.

Step 14. Enter your product key.

Step 15 - Name the computer, and enter an Administrator password. Don't forget to write down your Administrator password.

Step 16 - Enter the correct date, time and choose your time zone.

Step 17 - For the network setting choose typical and press next.

Step 18 - Choose workgroup or domain name. If you are not a member of a domain then leave the default settings and press next. Windows will restart again and adjust the display.

Step 19 - Finally Windows will start and present you with a Welcome screen. Click next to continue.

Step 20 - Choose 'help protect my PC by turning on automatic updates now' and press next.

Step 21 - Will this computer connect to the internet directly, or through a network? If you are connected to a router or LAN then choose: 'Yes, this computer will connect through a local area network or home network'. If you have dial up modem choose: 'No, this computer will connect directly to the internet'. Then click Next.

Step 22 - Ready to activate Windows? Choose yes if you wish to active Windows over the internet now. Choose no if you want to activate Windows at a later stage.

Step 23 - Add users that will sign on to this computer and click next.

Step 24 - You will get a Thank you screen to confirm setup is complete. Click finish.

Step 25. Log in, to your PC for the first time.

Step 26 - You now need to check the device manager to confirm that all the drivers has been loaded or if there are any conflicts. From the start menu select Start -> Settings -> Control Panel. Click on the System icon and then from the System Properties window select the Hardware tab, then click on Device Manager.

If there are any yellow exclamation mark "!" next to any of the listed device, it means that no drivers or incorrect drivers has been loaded for that device. In our case we have a Video Controller (VGA card) which has no drivers installed.
Your hardware should come with manufacturer supplied drivers. You need to install these drivers using the automatic setup program provided by the manufacturer or you need to manually install these drivers. If you do not have the drivers, check the manufacturers website to download them.
To install a driver manually use the following procedure:
(a) From the device manager double click on the device containing the exclamation mark.
(b) This would open a device properties window.
(c) Click on the Driver tab.
(d) Click Update Driver button. The Wizard for updating device driver pops up as shown below:

You now get two options. The first option provides an automatic search for the required driver. The second option allows you to specify the location of the driver. If you don't know the location of the driver choose the automatic search which would find the required driver from the manufacturer supplied CD or Floppy disk. Windows would install the required driver and may ask you to restart the system for the changes to take affect. Use this procedure to install drivers for all the devices that contain an exclamation mark. Windows is completely setup when there are no more exclamation marks in the device manager.
TeamViewer establishes connections to any PC or server all around the world within just a few seconds. You can remote control your partner's PC as if you were sitting right in front of it.
Features:
1. Remote support without installation.
2. Remote presentation of products, solutions and services.
3. File transfer.
4. Works behind firewalls.
5. Optimized Performance.
6. Highly Secured.
7. Free of Cost.
How to Use it ?
Install Teamviewer on both computer. After that run the application. Discussed the id and password with remote user.

Now to create session type the id of the remote computer which you need to connect remotely.
Select Remote support and click on "Connect to Partner". It will prompt you for password. Request the remote user for password so that you can connect with his pc. If you need to do file transfer select "File transfer" in place of remote support.
- Go to Control Panel | Scheduled Tasks.
- Double-click Add Scheduled Task to launch the Scheduled Task Wizard.
- Click Next and then click the Browse button.
- Access the Windows\System32 folder, select Shutdown.exe, and click Open.
- Follow the wizard through the next two screens to give the task a name and choose a schedule.
- Enter your user account name and password and click Next.
- Select the Open Advanced Properties check box and click Finish.
- In the task’s Properties dialog box, add the /r parameter to the end of the command line in the Run text box and click OK. (Be sure to include a space between the last character in the command name and the first character in the parameter list.)
- Enter your user account name and password and click OK.
When the Shutdown utility runs, you’ll momentarily see a small dialog box on your screen before the system restarts.
Crack Windows Genuine Advantage (WGA) v1.9.40.0 and Office Genuine Advantage (OGA) v2.0.48.0 !
This installer will resolve the issues with WGA and OGA. It includes fix for tray icon and toolbar notification.Working on Windows Update, Office Update, Microsoft updates and Microsoft Download.
Antivirus doesnt detect these packing tools.